
![]() You probably got here because you want safe, healthy drinking water for you and your family.. And, trust me, the Reverse Osmosis system can deliver!
You probably got here because you want safe, healthy drinking water for you and your family.. And, trust me, the Reverse Osmosis system can deliver!
If you don’t want to read about the technicalities, you can go directly to the section 'Components'.
According to Wikipedia, Reverse osmosis (RO) is a water purification technology that utilizes a partially porous membrane to remove ions, molecules, and larger particles from drinking water.
In reverse osmosis, an applied pressure is used to overcome osmotic pressure, a colligative property (that depends on the ratio of the number of solute particles to the number of solvent molecules in a solution, and not on the nature of the chemical species present), that is driven by chemical potential differences of the solvent, a thermodynamic parameter.
![]() Reverse osmosis can remove many types of dissolved and suspended chemical species, as well as biological ones (bacteria) from water, and is used in both industrial processes and the production of potable water. The result is that the solute is retained on the pressurized side of the membrane, and the pure solvent (such as solvent molecules, i.e., water, H2O) is allowed to pass to the other side.
Reverse osmosis can remove many types of dissolved and suspended chemical species, as well as biological ones (bacteria) from water, and is used in both industrial processes and the production of potable water. The result is that the solute is retained on the pressurized side of the membrane, and the pure solvent (such as solvent molecules, i.e., water, H2O) is allowed to pass to the other side.
![]() Reverse osmosis differs from filtration in that the mechanism of fluid flow is by osmosis across a membrane. The primary removal mechanism in membrane filtration is size exclusion, where the pores are 0.01 micrometers or larger, allowing the process to theoretically achieve perfect efficiency regardless of parameters such as solution pressure and concentration. Reverse osmosis instead involves solvent diffusion across a membrane that is either nonporous or uses nano-filtration with pores 0.001 micrometers in size.
Reverse osmosis differs from filtration in that the mechanism of fluid flow is by osmosis across a membrane. The primary removal mechanism in membrane filtration is size exclusion, where the pores are 0.01 micrometers or larger, allowing the process to theoretically achieve perfect efficiency regardless of parameters such as solution pressure and concentration. Reverse osmosis instead involves solvent diffusion across a membrane that is either nonporous or uses nano-filtration with pores 0.001 micrometers in size.
![]() Is it safe to drink reverse osmosis water?
Is it safe to drink reverse osmosis water?
Yes, both distilled and reverse osmosis water are devoid of minerals, but ingesting mineral-free purified water is not harmful to your body. ... Rainwater is not "dead water!" Minerals are essential to our cellular metabolism, growth, and vitality, and we get the majority of them from eating food, not drinking water.
Reverse osmosis is the most effective way to purify your tap water, but picking the right options for your first reverse osmosis system can be a little overwhelming. It was for me, too, when I ordered and installed my first system. Read my tips below.
Some people have expressed concern after reading the articles about the long-term negative side of RO. Almost all concerns are based on research from the 1980s by the World Health Organization. To the best of my knowledge, that research had some notable flaws and tends to exaggerate concerns. Reverse osmosis water is safe to drink, especially when compared to other alternatives. Buy the systems with the remineralization post-filter, which will compensate for most essential minerals.
![]() COMPONENTS
COMPONENTS
Depending on your needs, you may purchase and install one or more stage filters (ranging from 3 to 7).
1st stage filter: High-grade & high-capacity polypropylene sediment filter - removes dust, particles, and rust. Protects and extends the life of the membrane and system.
2nd stage & 3rd stage filters: Premium extruded carbon block – to get rid of unpleasant chlorine, tastes, odors, cloudiness, colors, and other common chemicals from the water.
4th stage: Industry's highest quality FILMTEC (DOW Chemical) high rejection TFC reverse osmosis membrane. Removes up to 99% of Total Dissolved Solids (TDS) and contaminants, including arsenic, lead, fluoride, chromium, radium, bacteria, viruses, and more.
5th stage: Advanced coconut shell refining carbon - Total Contamination Removal (TCR) filter removes any possible residual taste from the tank.
I have enhanced the drawing (thanks to the author!) by adding pictures of the components. Click on the drawing to zoom in.
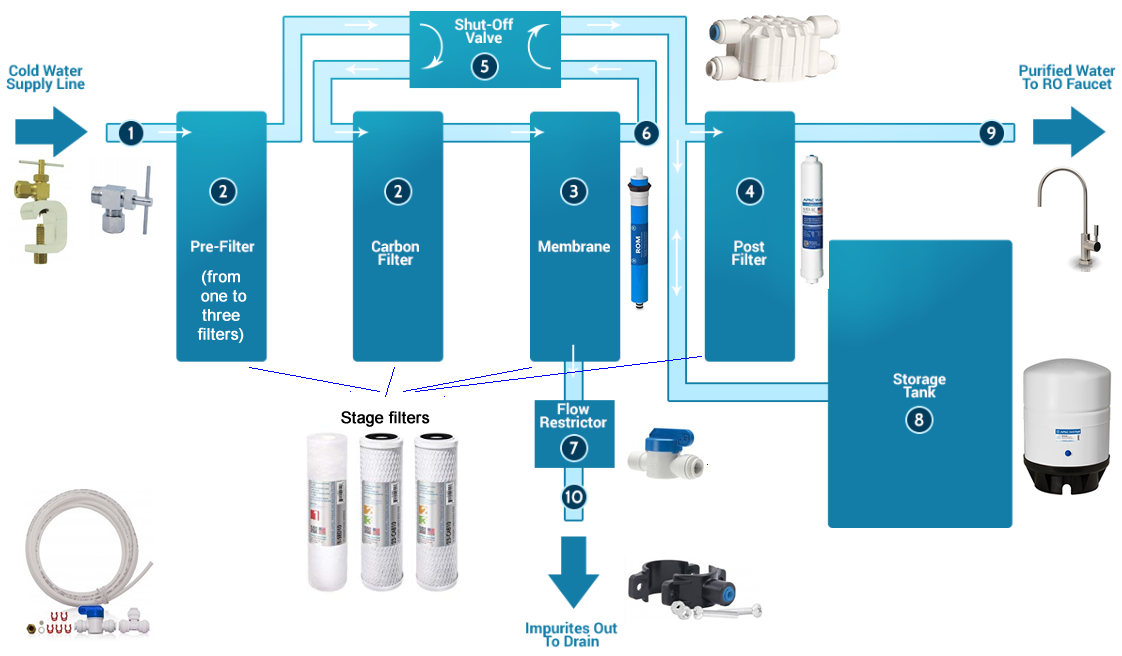
- Cold Water Line Valve
- Stage filters (sediment or carbon)
- Membrane Filter
- Post filter
- Automatic Shut Off Valve (SOV)
- Check Valve (prevents the backward flow of treated water from the RO storage tank)
- Flow restrictor
- Storage tank
- Faucet
- Drain lane and wrap-around bracket
- Re-mineralization filter (stage 6) – not shown on the diagram
- Pump (if needed)
- Tightening wrench, plastic fittings, plastic tubes
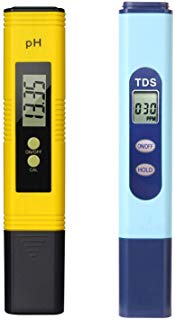
- Water Quality Test Meter
Water that has been purified by reverse osmosis can be tasteless. This is because it is slightly acidic, and all of the dissolved minerals that provide flavor have been removed. After the water has been purified through the RO membrane, it passes through a remineralization filter. This adds safe minerals back into the water and raises the pH level to make it more alkaline. The result is a fresher-tasting mineral water that many people prefer.
By adding one more final filter, you can achieve aquarium-quality water with the 7-stage filters.
Additionally, it comes optionally with a permeate pump, a non-electric device that increases the water pressure before it enters the filters. This reduces water waste up to 80% and increases water production up to 50%. Both of these are important if you are on city water or care about efficiency.
As I mentioned in the previous article in the MAN HEALTH category, you can install a reverse osmosis system under the sink if you own an apartment or a house. You will need to drill through the countertop to install the purified water faucet. If you rent, your first choice would be the Brita-style filters with pitchers.
![]() WHAT BRAND OF RO TO BUY?
WHAT BRAND OF RO TO BUY?
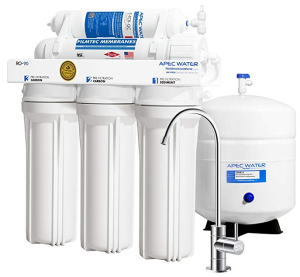
 My very first reverse osmosis system arrived from AquaSafe (a Canadian company that is not in business anymore). Therefore, when I was ready to replace the old one, after conducting intensive research, I chose the APEC reverse osmosis system, and I still don’t regret it.
I liked it because:
- Great customers’ comments after many units sold
- Comparatively affordable
- Good instruction and all the connectors worked flawlessly (and my previous experience has helped a lot)
- If you send back the pictures of the assembled system, the company returns the set of replacement filters for free.
- I spent less than 2 hours total for installation (including reading the instructions)
- The system is tranquil
- Nice-looking faucet
- Maintenance options are affordable
- Water tastes excellent, and the TDS reading went down from 135 ppm (tap water) to 30 ppm. Note: I never contacted the company or received any compensation for endorsing their product. It was just my first choice. So, do your own research.
![]() Here are some tips based on my experience:
Here are some tips based on my experience:
- The most challenging part of coupling up a water filter to your water supply is tapping into the water supply line. Some plumbers recommend clamping a piercing saddle valve onto the copper pipe without the need for solder; however, this type of coupling is prone to leakage over time. The best way to tackle this chore is to remove a small section of pipe and install a soldered T-fitting. Once that is done, connecting a 1/4-inch copper tube to the T-fitting, with a plastic connector tube to the other end, is a straightforward procedure.
- Always use the white PVC Teflon tape when you connect PVC Joints. Don't over-tighten joints by giving them "one more turn to be sure." Do finger-tighten plus one or two turns - No More.
- On threaded male PVC fittings, each successive thread is slightly larger in diameter than the one before it. Female threads get successively smaller. This is called taper, and the amount of taper is specified (1¾ degrees) in the American National Standard B2.1. All pipe manufacturers voluntarily adhere to these standards to ensure their customers receive high-quality materials.
- Because the threads are tapered, additional turns cause the female part to stretch or undergo "strain." This will split the female fitting just as a wedge, driven by a sledgehammer, will split a tree stump.
- If you used the piercing saddle valve that is usually supplied with the system, I recommend adding one more plastic valve between the system and a supplying line -- it can be easily reached vs. diving under the sink and trying to locate the water valve attached to the cold-water line.
- Read the instructions carefully and figure out how the colored tubes are connected to each component.
- Have the aluminum pan about 4-5” high to put under the assembled system. In the event of a water leak during your first test, it will retain the water.
- When you tighten the first-stage filters, make sure you do not displace the O-rings. Do not assemble them in a horizontal position! Tighten them firmly.
- Leave the system in the aluminum pan or attach it to the wall of the cabinet under the sink using two screws. I have attached it, but please keep the pan under the RO system.
- If you need to cut the tube, make sure you have a very sharp knife. Make the cuts absolutely perpendicular to the cutting board; otherwise, your tube will leak under pressure.
- Try connecting/disconnecting the tubes BEFORE final installation to get familiar with the procedure. Trust me, it will save you time in the long run.
- Give about two hours to get the tank full. Only then open the faucet and let the water run until the tank is EMPTY. Repeat the procedure one more time. It will remove the small particles from the tank. Then, fill the tank again and taste the water.
- Test the water quality with an included meter: fill in the glass with tap water (I had about 135 on my meter), and then repeat the same with filtered water (I had about 30!).
- Buy replacement filters and replace them once every 6-8 months, depending on usage.
- Never buy a Chinese-made RO. You will initially save, but you will soon be frustrated with the high maintenance costs and poor technical support.
- Finally, there are several YouTube videos on “how to” assemble everything. If you get stuck, please don't hesitate to contact me (I’d be happy to assist) or look online for further assistance.
- If you have any problem with the amount of water, it is a sign that you need to add pressure to the tank (8-10 psi). However, be sure to follow the correct procedure, or you risk damaging the tank.
After all, I'm pleased with my reverse osmosis system, which provides excellent water quality. And the coffee made with this water tastes great.
Get one RO for your family and carry your water in a glass or metal bottle when you need it! Be a man’s man!
Would you like the article? You can just enter your information below and receive notifications about new posts, if you don't mind. 100% spam-free!